Mac Tips for Techs: Activity Monitor -the Task Manager for a Mac

Standard


Before my Mac completely ticked me off, and I broke up with Apple, I was dealt a blow had been frustrating and ongoing (more on that in later blog posts). I had not been able to get my machine to turn off the digital optical out; my speakers were unusable on my MacBook Pro.

Because of this, and after a ton of Google research, I had been trying various troubleshooting techniques. One of them was to stop the CoreAudio service.

On a PC this is simple: you open Task Manager, you browse the running processes, and you kill them. However, how do you stop processes from running on a Mac? You can use a great utility called Activity Monitor, which is a built-in tool on the Mac that can be found by typing Activity Monitor into your spotlight.

ActivityMonitor
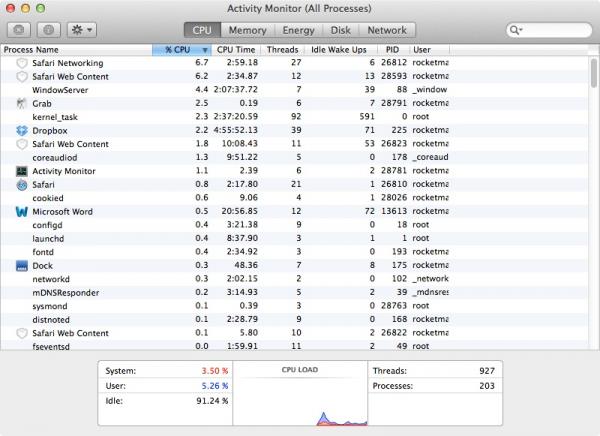
From here, this should look pretty similar to Task Manager. You have your processes listed, and you can sort the list in a variety of ways. You can also select individual processes and click the X in the upper left-hand corner to kill the process.

You can also search the processes via how they affect memory, energy, disk, or the network, in addition to the default of CPU. This is crucial if you are troubleshooting certain issues with your Mac — such as whether you are low on RAM, or maybe the Mac’s battery life is dying too quickly (check the energy tab).

This is a great tool for troubleshooting a Mac, and should be included in any technician’s toolkit.


What You Might Want to Think About Before Installing Yosemite

Standard

Apples-OS-X-Yosemite

Yosemite, the new Mac OS that replaced Mavericks this year, was released to much fanfare. And for the most part it has been a very solid operating system. You can install this OS for free from Apple’s AppStore (for anyone running Snow Leopard or later), so what’s not to love?

For me, I was very excited about Yosemite, and even wrote a blog post about its release. However, after a few months, I have decided not to install Yosemite for a few reasons (and by the way, these reasons should be taken into consideration, even if you have a Windows PC and are thinking about upgrading your OS).

  1. The biggest reason for me is the functionality of applications. Many applications I use have not been written to work for Yosemite at the moment — and if you have critical applications, you should NOT go to a new OS until you have tested all of your applications.
  2. Bugs. Every OS starts off with a few bugs, and while they quickly figure out the kinks, I am not interested in going through the motions until these are worked out. I would prefer to give the OS a few months to let others work through those until I am on-board.

There are a few other reasons, such as you own an old Mac that might not be able to handle Yosemite, or you don’t know your Apple ID username or password, but the two reasons above are the biggest reasons I have chosen not to move to Yosemite… yet.

I suppose a third reason could be that I am lazy. Because there are options, so I could move forward…, but I have yet to act on them.

When you decide to move to a new OS, you MUST make a backup of your machine. There are many instances where the OS installation will go bad, leaving you with a corrupt OS. If you don’t have a backup of your system, you are stuck. I also ensure I have a backup to which I can restore my old OS, in case something goes wrong (such as Yosemite not being able to open my apps).

You actually have a built in tool for handling backups, called Time Machine. Taking a backup with Time Machine is easy. Launch Time Machine from Spotlight in the upper right hand corner, and point to the backup disk you would like to take the backup to. I do this manually and connect an external drive to my Mac in order to take a proper backup.

tm_sys_prefs Once you have a successful backup, you can actually restore your OS, using that backup. To do that, you need to boot into the OS X Recovery system. When booting your Mac, hold down command+R until the Apple logo appears.

One of the options should be ‘Restore from Time Machine Backup. You can then choose that, and the location of the backup you just took, and restore your system. It is as simple as that.

Doing this should give you the peace of mind that if you need to go back to Mavericks, you have the ability to do so. You also have some other options out there for creating backups and restores, and I discussed one of these options in another blog recently as well. Carbon Copy Cloner gives you a great user interface and easy-to-use tools for doing the exact same thing as Apple’s Time Machine.

With options such as these, you don’t have an excuse not to try out Yosemite (unless you are lazy, like me). :) I will get around to it eventually, and when I do, I promise to write a full review! In the meantime, remember: if you need help either backing up or restoring your systems for your business, we are always here for you, 24/7, at Everon: 888-244-1748.

Mac Tips for Techs: Onyx for Mac — your #1 cleaning tool

Standard

OnyXOnyx for the Mac. If you are not a Mac Genius, but you know a bit about IT, you may have wondered how to clean a Mac like you can a PC. This is the tool that can take you where you need to be!

Onyx has been likened to Piriform’s C-Cleaner tool, however, this tool has many more functions than the Piriform tool you are used to using on a PC. First off, you can get the Onyx download from here. (Take note of your OS, as you must download and install the Onyx version that works with your OS. You can also use that link to get some older versions of Onyx for the older Mac OSes as well.)

When you launch Onyx for the first time, you are immediately requested to check the SMART status of the hard disk installed in your Mac. This is highly recommended and only takes around 30 seconds, so let that scan. It will let you know if there is anything it finds that needs to be resolved. From there you can use the Disk Utility application to resolve SMART errors on the disk. Regardless of whether you have SMART errors, you can still proceed to work within Onyx for other items.

The latest version of Onyx has many tabs: Verifying, Maintenance, Cleaning, Utilities, Automation, Parameters, Info, and Log. Onyx is well known for its Cleaning tab, in which you can choose to clean your System cache, User cache, Internet cache and cookies, Fonts cache, Logs, Mics items, and Trash. (In the trash tab, you also have a chance for securely deleting the trash, which means the files deleted are securely overwritten with jumbled data.)

In addition to the Cleaning tab, you can also do so much with the other tabs:

The Maintenance tab allows you to repair permissions, build and run scripts and rebuild aspects of the OS.

The Verifying tab runs the same SMART and structure checks of the hard disks and partitions that run on start-up of Onyx, so if you need to re-run those commands, you can run them from there.

The Utilities tab has many sub-tabs with a wealth of functions. I would suggest you go through this and see for yourself what you can do, as there are too many to name here. You will need to understand IT quite a bit more than normal, however, as some of the commands in the Utilities tab can be a bit daunting.

The Automation tab allow you to do several of the Onyx options all in one. It is very helpful if you want to set up a bunch of tasks to run off of one push of the button.

The Parameters tab is one of my favorites. This tab is really good for customizing your Mac, as you can set up animated desktop backgrounds, customize Finder and Dock options, and even edit options for some of Apple’s most-used applications (Safari, iTunes, Quicktime). You also have the ability to edit and display messages on login, and customize the spotlight, mission control, and others.

The last two tabs are self-explanatory: Info and Log. Both display exactly what you expect them to. The Info tab shows model information, processor, RAM, disk info, OS, profile, antivirus protection information, and whole host of other info. Basically, anything and everything you might be looking for to learn about the Mac will be stored in here. The Log tab shows the logs that are written based on the functions of Onyx, in case you need to review why a function did or did not work.

This is an extremely powerful tool that should be a part of any Mac IT engineer’s repertoire. It is even a great tool for anyone with basic information on Macs, as it can help keep your mac clean and healthy for years to come.

If you would like to review Onyx on a Mac, feel free to call in to our Mac engineers at Everon IT: 888-244-1748.


Mac Tips for Techs: Troubleshooting network issues on a Mac

Standard


If you are used to Windows and have to troubleshoot networking on Mac, it’s a bit different of a process. The commands you are used to running in the cmd prompt on Windows don’t apply to a Mac, since the Mac uses a Linux-based OS. You can fudge your way through some basic commands. However, what if you need to do quick networking, and you don’t have the ability to Google-search your commands? Mac actually has a really nice built-in tool called Network Utility that can help when you’re trying to figure out why your Mac cannot connect online.

Network Utility can be found on your Mac by searching with the spotlight. In the upper right hand corner of your desktop, you can click on the magnifying glass and type: Network Utility. This will launch a window that gives you a multitude of commands to be run on the various network adapters available to you.

Jeff article 9-8-2014

If you need to see whether your adapter is getting an IP address from the DHCP server, simply check the Info tab. You can choose the adapter you need to check, and when it pulls up, you get the MAC address (called “hardware address” on a Mac), the IP address, link speed, status, vendor and model. On the right you also have packet information.

Your next tab is Netstat. This allows you 4 options:

  1. Display routing table information
  2. Display comprehensive network statistics for each protocol
  3. Display multicast information
  4. Display the state of all current socket connections

Your next tab is the Ping. This allows you to either enter an IP address or a hostname for pinging. It will also allow a constant ping, if necessary.

Your next tab is the nsLookup tab. This allows lookups on the IP address or hostname, depending on what you need.

Your next tab, like nsLookup, is Traceroute. It will allow both IP address or hostname, depending on your needs.

The next tab is something you normally don’t have built into PCs, but can be very useful, is the Whois search. You have many options for whois servers to use, or you can enter your own. This information is obtained when connected to the Internet, so you can use that feature here instead of going to one of the Whois servers.

The next tab is the Finger tab. This tab is not very well known, and it is a very early form of status updates, according to Apple. You probably will not find this tab very useful, however it is still built into Macs for use, if necessary.

The last tab is the Port Scan tab. This is a great tool if you are an engineer wanting to know what ports are open on a network. You can choose to only test ports between a certain amount, or you can test an entire network. The scan takes a bit to bring back the open ports, however, it can be very useful when working on a firewall.

Of course, all of these commands can be done through the terminal (Mac’s equivalent of the command prompt). However, if you are troubleshooting the reason that a Mac cannot connect to the Internet, and you are not a Mac Genius, this is the best tool for you.

If you need help with your Mac, we do have Mac engineers on staff here at Everon IT to help with your Mac needs. Call us at 888-244-1748, we’ll be glad to help!