How to Open Multiple Windows in Excel, on Multiple Monitors

Standard

 Excel monitors

Recently, a colleague taught me a neat trick in Excel. We’re both huge fans of the program, and we get strangely excited when we acquire new tips and tricks. Normally, the tricks we seek have something to do with complicated formulas or pivot tables. But this time it was something as simple as “How to open multiple windows in Excel, on multiple monitors.”

I’m sure anyone who has used Excel before knows that you can’t open two separate spreadsheets in two separate windows. I find that extremely frustrating because my job often requires me to compare data between different spreadsheets.  As a user with two monitors, I want to be able to compare those files side by side on each of my screens. Are you in the same boat?

Well, I have the answer to our problem. Behold! How to open multiple windows in Excel…

Step 1: Open up your first Excel spreadsheet (in the way that you normally would).

Step 2: Open your start menu and locate the Excel icon.

Step 3: Press and hold the “Alt” key and select the Excel icon with your mouse.

Step 4: BOOM! You now have two separate files open in two separate windows.

Excel

(Note: This process also works with more than two windows.)

You may also like:

Excel Power Users: Don’t Be Scared - Use Arrays!

Standard

array


As a frequent user of excel, at what I would consider advanced-level expertise, I spend my days flying through data connections, pivots, all kinds of complex formulas, and even a dash of VBA. But there was still one hurdle I hadn’t jumped. For some odd reason those squiggly brackets { } (technically I believe they’re called “braces”) had intimidated me from dabbling in the world of arrays. Something felt unnatural about hitting ctrl + shift + enter before exiting a formula. What magic would happen behind the scenes if I pushed those buttons simultaneously? I understood the logic and language of Excel, so asking it to “work differently” just seemed bizarre. I found myself working around actually using arrays by means of  extra columns, pivots, and very elaborate lookups and formulas.

This past week, however, I faced my fear and jumped in… three keys at a time!

Game changer!

Imagine you have a list of contact dates and clients. You want to figure out how recently each person has been contacted by running a quick summary on the data. Sure, you could throw a pivot on the data, but what if you needed it in the table format? There is not a “MAXIF” formula to perform this action. In fact, for all its strengths, there is a gap on available “IF” formulas in Excel. Enter-in arrays! Arrays give you the power to combine formulas that analyze data in tabular form without having to pivot the data.

Here’s how it works:

Let’s say you have a list of sales, and you want to be able to reach out to clients with whom you haven’t spoken in a while. Knowing the last contact date alongside their YTD sales will help you make sure that you are staying on top of communication with your best customers. Here’s a list of sales with contact dates. We can easily throw a “SUMIF” formula in to calculate the running total, per customer, per line. But finding out the most recent (or “max”) date is not so easy, because you cannot make a “MAXIF” formula. Instead, we can “nest” them with an array.

image1

In everyday language, we need the formula to perform the following tasks:

=MAX(number1, number2,…)

where the numbers are all in column A, “Contact Date.” If we just do MAX, it won’t take the customer into account. We need to add a criterion to also look for the max date of that customer.

image2

In theory it should be this:

=MAX(IF(Customer Name = This Row’s Customer Name, THEN return the Max date from column A, OTHERWISE return a 0)

image3

Unfortunately it doesn’t wrap the IF with the MAX and it produces a result that is the max overall. So let’s jump into those scary squiggly braces and see what we can do.

When you use the exact same formula — but before hitting enter at the end — instead, hold down CTRL + SHIFT + ENTER. You’ll see that Excel adds braces { } around the formula. When you copy this down, the formula magically evaluates both conditions across all the data you’ve selected. Voila! You have now added analytics to your table.

image4

NOTE:  You cannot simply add braces to your formulas to make this happen. You have to hit ctrl + shift + enter to make Excel perform the array formula.

So… What’s the takeaway? What can this do for you? By performing this array formula and quickly sorting my list… looks like I better reach out to Examples R Us. They’ve spent the most and it’s been the longest since they’ve been contacted.

image5

Imagine what arrays can do to inform your business!

Tech Tips for Techs: Programmatically Creating an Excel Spreadsheet

Standard


This article will show you how to programmatically create an Excel spreadsheet. I wrote this in VBScript, since it is readily available and easy to translate to other languages. I wrote the code to be modular, and, with the use of a few global variables (yeah, I know), it can be easily customized to meet your needs.
Here is the complete program. Just copy everything into a text editor (or a VBScript Editor if you have one) and save it a “MyDir.vbs.”

'*******************************************************************************
'*** MyDir
'*** Written by Frank Lindsey at Everon IT / PlumChoice
'*** [email protected] NO SOLICITATIONS, I have one of those
'*******************************************************************************
'*** Description:
'*** This script will create an Excel Spreadsheet containing the files found in
'*** the DEFAULT_PATH.
'***
'*** Assumptions:
'*** - WScript 5.6+
'*** - Microsoft Excel 2003+
'*** Coding Rules:
'*** - Variable names are in the format of []
'*** - Global names are proceeded with a G
'*** - In  caps are used to delineate words
'*** - s are:
'***      int Integer
'***      str String
'***      obj Object
'***      col Collection of objects
'***      ary Array
'***        l logical
'*** - Constant names are all caps with a "_" used as word a separator
'*** - Subroutine names are in the format of sub
'*** - Function names are in the format of fun
'*** - Code formatted to be viewed at 80 columns
'*** -    No tab characters, indent level is three spaces
'***
'*** Revision History:
'*** Original coding: 07/18/2014 Frank Lindsey
'*** Reformatting:    08/07/2014 Frank Lindsey 
'***
'*******************************************************************************
'*** Public Domain
'*** This script is released into the public domain. You may use it freely.
'*** However, if you make any modifications and redistribute, please list your
'*** name and describe the changes under Revision History.
'***
'*** This script is distributed without any warranty, expressed or implied. If
'*** you choose to use this script, in whole or in part, you agree to take sole
'*** responsibility for any problems that may occur.
'*******************************************************************************
'***[ Initializations ] ********************************************************
Option Explicit 'Verify we are running WScript before we do anything else
If (InStr(LCase(WScript.FullName),"wscript") = 0) Then
   Call subCheckScriptHost()
End If
'*** [ Declarations ] **********************************************************
'**************************************************************
'** User Definable - reset these values to customize the script
'**************************************************************
'Constants
Const DEFAULT_PATH = "C:\Windows\"    'This is the folder we will list
Const REPORT_TITLE = "My DIR Listing" 'This is the complete title
Const SAVE_FILE    = "MyDir"          'This is the output file name
Dim GintRow 'Current row in spreadsheet
'**************************************************************
'** Create Global Objects - Objects used through out the script
'**************************************************************
'Objects
Dim GobjExcel : Set GobjExcel = Nothing
On Error Resume Next
   Err.Clear
   Set GobjExcel = WScript.CreateObject("Excel.Application")
On Error Goto 0 'Any Errors?
If Err.Number  0 Then
   Call subCloseApp("Run time Error.", _
                    Err.Number,        _
                    Err.Description,   _
                    Err.Source)
ElseIf (GobjExcel Is Nothing) Then
   Call subCloseApp("Fatal Error creating Excel object", _
                    Err.Number,                          _
                    Err.Description,                     _
                    Err.Source)
End If
'Integers
Dim GintColumns : GintColumns = 12 'Set to the number of Columns
'Arrays
Dim GaryHeaders()
'Fill the headers. Start with 1 in the arrays
ReDim GaryHeaders(GintColumns)
GaryHeaders( 1) = "Attributes"    : GaryHeaders( 2) = "Created"
GaryHeaders( 3) = "Last Accessed" : GaryHeaders( 4) = "Last Modified"
GaryHeaders( 5) = "Drive"         : GaryHeaders( 6) = "Name"
GaryHeaders( 7) = "Parent Folder" : GaryHeaders( 8) = "Path"
GaryHeaders( 9) = "Short Name"    : GaryHeaders(10) = "Short Path"
GaryHeaders(11) = "Size"          : GaryHeaders(12) = "Type"
'***[ MAIN ]********************************************************************
'*********************
'** Local Variables **
'*********************
'Objects
Dim objFile        : Set objFile        = Nothing
Dim GobjFileSystem : Set GobjFileSystem = Nothing
Dim objFolder      : Set objFolder      = Nothing
On Error Resume Next
   Err.Clear
   Set GobjFileSystem = CreateObject("Scripting.FileSystemObject")
   Set objFolder      = GobjFileSystem.GetFolder(DEFAULT_PATH)
On Error Goto 0
'Any Errors?
If Err.Number  0 Then
   Call subCloseApp("Run time Error.", _
                    Err.Number,        _
                    Err.Description,   _
                    Err.Source)
ElseIf (GobjFileSystem Is Nothing) Then
   Call subCloseApp("Fatal Error creating FSO object", _
                    Err.Number,                        _
                    Err.Description,                   _
                    Err.Source)
ElseIf (objFolder Is Nothing) Then
   Call subCloseApp("Fatal Error creating FSO Folder object", _
                    Err.Number,                               _
                    Err.Description,                          _
                    Err.Source)
End If
'Collections
Dim colFiles : Set colFiles = Nothing
'Arrays
Dim aryFileInfo()
'*******************
'** Start of code **
'*******************
Call subBuildXLS
Set colFiles = objFolder.Files
ReDim aryFileInfo(12)
For Each objFile in colFiles
   With objFile
      aryFileInfo( 1) = .Attributes       : aryFileInfo( 2) = .DateCreated
      aryFileInfo( 3) = .DateLastAccessed : aryFileInfo( 4) = .DateLastModified
      aryFileInfo( 5) = .Drive            : aryFileInfo( 6) = .Name
      aryFileInfo( 7) = .ParentFolder     : aryFileInfo( 8) = .Path
      aryFileInfo( 9) = .ShortName        : aryFileInfo(10) = .ShortPath
      aryFileInfo(11) = .Size             : aryFileInfo(12) = .Type
   End With
   Call subAddLineXLS(aryFileInfo)
Next
'Save all of our work
If funSaveFiles(SAVE_FILE) Then
   MsgBox "Your inventory run is complete!", _
          vbInformation + vbOKOnly,          _
          REPORT_TITLE
End If
GobjExcel.Visible = True 'Show the output Excel file
'***[ End of MAIN ]*************************************************************
'*************
'** Cleanup **
'*************
'Object cleanup
Set GobjExcel = Nothing
WScript.Quit 'Really and truely not necessary
'***[ FUNCTIONS ]***************************************************************
'****************************************************
'** funSaveFiles - Use the Excel Save File Routine **
'****************************************************
Function funSaveFiles(strFileName)
   '*********************
   '** Local Variables **
   '*********************
   'Strings
   Dim strFilter, strTitle, strFullName
   Call subFooter()
   funSaveFiles = False 'Default to fail
   'Configure Save As dialog box
   strFilter   = "Excel File (*.xlsx), *.xlsx"
   strTitle    = "MyDir Save As"
   strFullName = DEFAULT_PATH & strFileName & ".xlsx"
   'Start with a clean slate
   Err.Clear
   'Create the folder if it does not exist
   If Not (GobjFileSystem.FolderExists(DEFAULT_PATH)) Then
      On Error Resume Next
         Err.Clear
         GobjFileSystem.CreateFolder(DEFAULT_PATH)
      On Error Goto 0
   End If
   'Did we fail to create the directory?
   If Err.Number  0 Or Not (GobjFileSystem.FolderExists(DEFAULT_PATH)) Then
      MsgBox "Could not create the folder: '" & DEFAULT_PATH & "'"
   Else
      On Error Resume Next
         Err.Clear
         'Get the filename from user
         strFullName = GobjExcel.GetSaveAsFilename(strFullName, _
                                                   strFilter,   _
                                                   1,           _
                                                   strTitle)
         If Err.Number  0 Then
            MsgBox "Could not save Excel File: '" & strFullName & "'"
         Else
            Err.Clear
            GobjExcel.ActiveWorkbook.SaveAs strFullName
            If Err.Number  0 Then funSaveFiles = True
         End If
      On Error Goto 0
   End If
End Function
'***[ SUBROUTINES ]*************************************************************
'***************************************************
'** subCheckScriptHost - Are we running WScript? ***
'***************************************************
Sub subCheckScriptHost()
   '*********************
   '** Local Variables **
   '*********************
   'Constants
   Const WINDOW_HIDE = 0 'Run Command Window Style
   'Objects
   Dim objShell : Set objShell = Nothing
   'Strings
   Dim strExec
   '*******************
   '** Start of code **
   '*******************
   'Create Objects
   On Error Resume Next
   Err.Clear
   Set objShell = CreateObject("WScript.Shell")
   On Error Goto 0
   'Any Errors?
   If Err.Number  0 Then
      Call subCloseApp("Run time Error.", _
                       Err.Number,        _
                       Err.Description,   _
                       Err.Source)
   ElseIf (objShell Is Nothing) Then
     Call subCloseApp("Fatal Error creating Shell object", _
                      Err.Number,                          _
                      Err.Description,                     _
                      Err.Source)
   End If
   'Restart using WScript
   strExec ="%COMSPEC% /c "         & Chr(34) & _
            "wscript.exe //NoLogo " & Chr(34) & _
            WScript.ScriptFullName  & Chr(34) & Chr(34)
   objShell.Run strExec, WINDOW_HIDE, False
   Wscript.Quit
End Sub
'**************************************************
'** subAddLineXLS - Add Lines to the spreadsheet **
'**************************************************
Sub subAddLineXLS(ByRef aryLineDetail)
   '*********************
   '** Local Variables **
   '*********************
   'Integers
   Dim intCounter, intRows 'Basic Counters
   '*******************
   '** Start of code **
   '*******************
   intRows = UBound(aryLineDetail) + 1 'Number of rows sent
   For intCounter = 1 To intRows - 1
      GobjExcel.Cells(GintRow, _
      intCounter).Value = Trim(aryLineDetail(intCounter))
   Next
   GintRow = GintRow + 1 'We are now on the next row in the spreadsheet
   GobjExcel.Cells(1, 1).Select 'Back to the top
End Sub
'************************************************
'** subBuildXLS - Builds the actual Excel file **
'************************************************
Sub subBuildXLS()
   '***********************
   '*** Local Variables ***
   '***********************
   'Constants
   Const EXCEL_WHITE  =  2 : Const EXCEL_NAVY   = 11 : Const EXCEL_BLACK   =  1
   Const EXCEL_GRAY   =  3 : Const EXCEL_DBLUE  =  4 : Const EXCEL_LBLUE   =  5
   Const EXCEL_MAROON =  6 : Const EXCEL_OLIVE  =  7 : Const EXCEL_LPURPLE =  8
   Const EXCEL_TEAL   =  9 : Const EXCEL_ORANGE = 10 : Const EXCEL_DPURPLE = 12
   Const EXCEL_NONE = 0 : Const EXCEL_SOLID = 1 : Const EXCEL_AUTOMATIC = -4105
   Const EXCEL_LEFT   =     2 : Const EXCEL_RIGHT   =     4
   Const EXCEL_DOWN   = -4121 : Const EXCEL_UP      = -4162
   Const EXCEL_TOLEFT = -4159 : Const EXCEL_TORIGHT = -4161
   'Objects
   Dim objExcelRange : Set objExcelRange = Nothing
   '*******************
   '** Start of code **
   '*******************
   GintRow = 1 'Current row in spreadsheet
   ' Create the spreadsheet
   With GobjExcel
      .Visible = False
      .WorkBooks.Add
      .Sheets("Sheet1").Select()
      .Sheets("Sheet1").Name = REPORT_TITLE
   End With
   Call subAddLineXLS(GaryHeaders) 'Add the headers
   'Define objExcelRange
   On Error Resume Next
      Err.Clear
      Set objExcelRange = GobjExcel.Range("A1",Chr(Asc("A")+GintColumns-1)&"1")
   On Error Goto 0
   'Any Errors?
   If Err.Number  0 Then
      Call subCloseApp("Run time Error.", _
                       Err.Number,        _
                       Err.Description,   _
                       Err.Source)
   ElseIf (objExcelRange Is Nothing) Then
      Call subCloseApp("Fatal Error creating Excel object", _
                       Err.Number,                          _
                       Err.Description,                     _
                       Err.Source)
   End If
   'Format the header line
   With objExcelRange
      With .Interior
         .Pattern             = EXCEL_NONE
         .PatternColorIndex   = EXCEL_NONE
         .TintAndShade        = 0
         .PatternTintAndShade = 0
      End With
      .Font.Bold = True
   End With
End Sub
'**************************************************************
'** subCloseApp - Called to abnormal application termination **
'**************************************************************
Sub subCloseApp(strError, intError, strDescription, strSource)
   On Error Resume Next 'No way out
      '*********************
      '** Local Variables **
      '*********************
      'Strings
      Dim strMessage 'Error message to be displayed
      '*************
      '** Cleanup **
      '*************
      GobjExcel.Visible = True 'Show the output Excel file
      'Object cleanup
      strMessage = strError 'Start with the passed messsage
      'Add any error numbers
      If strError > 0 Then                                          _
         strMessage = "***"                              & vbCrLf & _
                   strMessage                            & vbCrLf & _
                                                           vbCrLf & _
                   "*** UNKNOWN ERROR: ABORTING ***"     & vbCrLf & _
                   "***"                                 & vbCrLf & _
                   " Error: "        & intError          & vbCrLf & _
                   " Description : " & strDescription    & vbCrLf & _
                   " Source: "       & strSource
      MsgBox strMessage, vbInformation + vbOKOnly, REPORT_TITLE
      WScript.Quit 'Abort, Abort, Abort
   On Error Goto 0 'Why? Too keep it clean
End Sub
'***************************************************
'** subFooter - added when speadsheet is complete **
'***************************************************
Sub subFooter()
   '*********************
   '** Local Variables **
   '*********************
   'Constants
   Const EXCEL_BLACK = 1 : Const EXCEL_LEFT = 2
   'Integers
   Dim intCounter 'Basic Counter
   'Arrays
   Dim aryFooters()
   '*******************
   '** Start of code **
   '*******************
   'Feel free to make this what you want
   ReDim aryFooters(2) 'Number of Footer notes + 1
   aryFooters(0) = "My Directory Listing (MyDir.vbs)"
   aryFooters(1) = "Listing for files in path: " & DEFAULT_PATH
   aryFooters(2) = "Written by Frank Lindsey [email protected]"
   GintRow = GintRow + 3 'Give us a little room
   With GobjExcel
      .Cells.Select
      .Cells.EntireColumn.AutoFit
      For intCounter = 0 To 2
         GintRow = GintRow + 1
         .Cells(GintRow, 4).Select
         .Selection.Font.ColorIndex     = EXCEL_BLACK
         .Selection.Font.Size           = 8
         .Selection.Font.Bold           = False
         .Selection.HorizontalAlignment = EXCEL_LEFT
         .Cells(GintRow, 4).Value       = aryFooters(intCounter)
      Next
      .Range("A1").Select
   End With
End Sub
'***[ End of SCRIPT ]***********************************************************
Comments

First let’s get the comment section out of the way. This is my standard opening comment section. In it I try to cover my coding style and any assumptions. As you can see, this script requires you have at least WScript 5.6 and Microsoft Excel 2003 (this should not be an issue unless you are still running Windows XP or older).

Initialization

In the INITIALIZATION section I am defining the Constants and Global variables. Most of these variables are the ones you change to customize this script. For example, DEFAULT_PATH is the directory that will be listed and the results placed in the spreadsheet.

Now let’s take a look at the FUNCTIONS and SUBROUTINES.

Functions

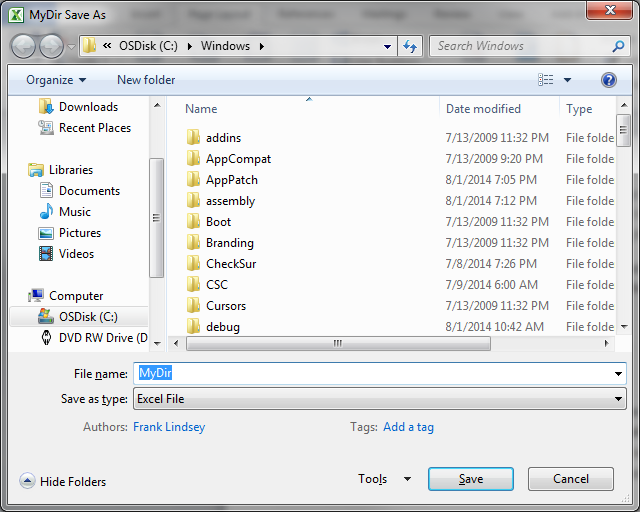
The function funSaveFiles handles the saving of files. Pass the filename as a string. The Files System routines used to check for a folder and create one are called if needed. We are able to call the actual Excel Save (GetSaveAsFilename) routine to save the file we created. This is nice, since all we need to do is define the file name (strFullName), display filter (strFilter), and the window title (strTitle) – Excel will take care of the rest.

MyDir 1

Subroutines

The subroutine subCheckScriptHost is a standard Subroutine I use in most of my code. It tests to see if WScript is running, if not it will start WScript and re-run the program for you. The main reason I choose to use WScript (as opposed to CScript) is that WScript uses MessageBox for standard output and CScript writes a line to the console window.

The subroutine subAddLineXLS   will simply add a new row of data to the spreadsheet. Just pass an array containing the data, one array object for each column in the row to be added.

The subroutine subBuildXLS will create the actual spreadsheet. I set Visible to False so the actual spreadsheet is not displayed until it is completed.  Some interesting things that are done in this subroutine are:

  • Add the headers by calling subAddLineXLS()
  • Select a range and make it an object: SetobjExcelRange = GobjExcel.Range()
  • Format the Object Range by setting the values objExcelRange.Interior…

The subroutine subCloseApp closes out the script and is called for normal and abnormal (errors) termination. The first thing I do is turn off error handling so if my exit routine returns an error, the script still terminates. Again, this is one of my standard subroutines.

I always like to put a footer on any report I create. The subroutine subFooter is straightforward and will create a custom footer based on a locally defined array. To customize, change the array size to the number of lines - 1. Finally, add an array object (starting at 0) for each line you want to add.

Coding Overview

A quick high level coding overview:

  • Check to see if we are running under WScript - subCheckScriptHost
  • Create New Excel File - subBuildXLS
  • Build and add the Header – subAddlineXLS
  • Add a line for each row of data - subAddLinesXLS
  • Create the footer - subFooter
  • Save the file and clean things up - subCloseApp

One more point. As you can see, I created my own Error Routine. It is very basic, as I just turn off error handling and then call my exit subroutine, if there is any error. I pass a custom message, the error number, the error description, and the error source to SubCloseApp.

In the program, here are the lines that accomplish the following (as listed above):

  • Check to see if we are running under WScript
    If(InStr(LCase(WScript.FullName),”wscript”)=0)ThenCallsubCheckScriptHost()
  • Create New Excel File
    Call subBuildXLS
  • Build and add the Header
    Call subAddLineXLS(GaryHeaders)
  • Add a line for each row of data
    For intCounter = 1 To intRows – 1
    GobjExcel.Cells(GintRow, _
    intCounter).Value = Trim(aryLineDetail(intCounter))
    Next
  • Create the footer
    CallsubFooter()
  • Save the file and clean things up
    If funSaveFiles(SAVE_FILE) Then
    MsgBox “Your inventory run is complete!”, vbInformation + vbOKOnly, REPORT_TITLE

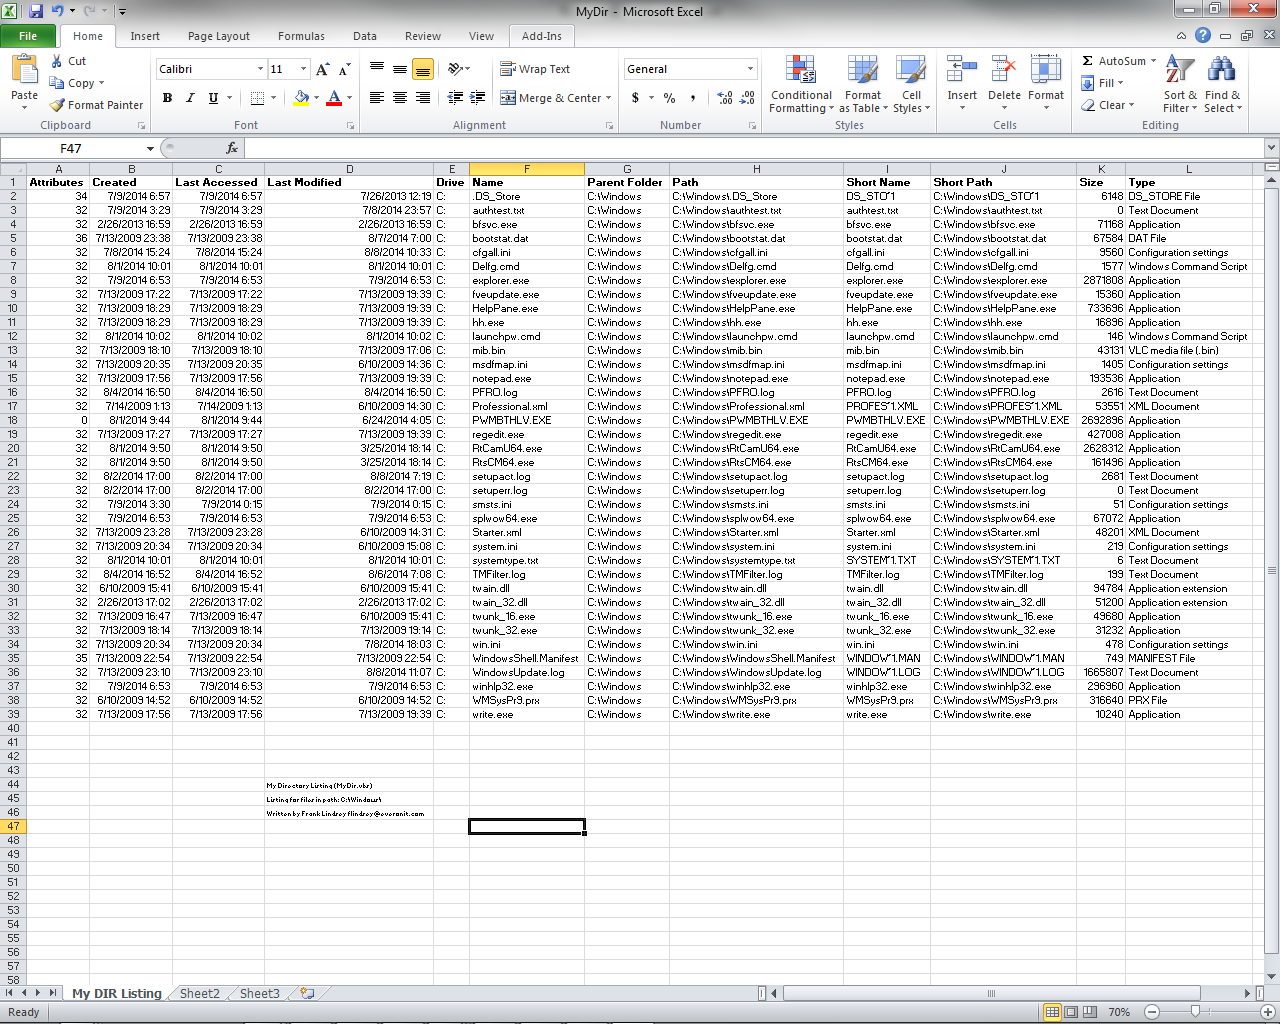
Your file output will look like this:

MyDir 2

I tried to make the program as modular as possible so you can just drop sections of code into your programs or just modify things to suit your needs.

Disclaimer

—————————

Public Domain
This script is released into the public domain. You may use it freely. However, if you make any modifications and redistribute, please list your name and describe the changes under Revision History.
This script is distributed without any warranty, expressed or implied. If you choose to use this script, in whole or in part, you agree to take sole responsibility for any problems that may occur.
Provided “as is,” with no warranty whatsoever.
Copyright © PlumChoice 2014

—————————

Questions or comments? Contact Everon at 888-244-1748. Or email Frank Lindsey at [email protected].

Excel Intermediate: Cleaning up formulas using Named Ranges

Standard


NOTE: All samples will be shown using Excel 2010. All examples and references will work in Excel 2003 – 2013, just the look and feel will be different.

One of the most difficult parts of understanding a complex Excel formula is determining what data is being referenced in the various ranges. For example, this formula seems more complex than it really is. You have no way of determining what is being compared in the IF statements without analyzing the ranges.

{=SUM(IF(Data!F2:F501='Dash Board'!C3,IF(Data!H2:H501>='Dash Board'!C4,IF(Data!I2:I501>='Dash Board'!C5,1,0),0),0))}

NOTE: This is an Array Function. If you are not familiar with them please read this blog.

All you can say for sure is that you are getting the total of rows on the Data page that meets three separate criteria.

Here is the same formula using Named Ranges:

{=SUM(IF(State=Project_State,IF(Employees>=Techs_Required,IF(Budget>=Project_Budget,1,0),0),0))}

That’s better. Now we know that we are testing the following criteria:

  • Is the State the same as the Project State?
  • Is the number of Employees greater than or equal to the Techs Required?
  • Is the Budget greater than or equal to the Project Budget?

All rows that meet these criteria will be counted.

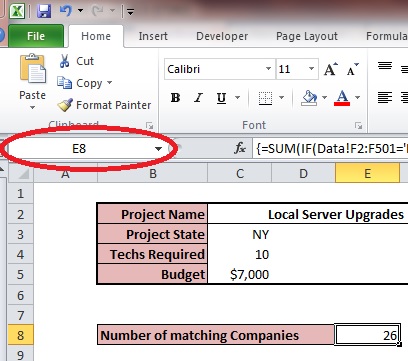
Now let’s see how we set this up. In the upper left hand corner is a box that shows the current cell / range that is selected. This is called the Name Box.

Named Range 1

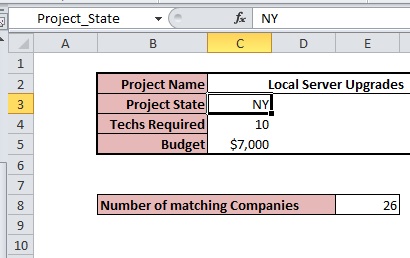
In the image above, you can see that cell E8 is currently active, and this is reflected in the Name Box. But did you know that you can change the Name of any cell or range of cells just by typing in the Name Box? Let’s give this a try. Click in cell C3 to make this the active Cell. Now click in the Name Box and type in “Project_State” (remember this is the name used in our second formula above). Once you press <Enter> the cell C3 will also be known as Project_State and can be referred to as such in any formula or reference.

Named Range 2

Now we need to create the references to cells C4 and C5 for our formula. Make cell C4 the active cell and name it “Techs_Required.” Finally, make cell C5 the active cell and name it “Projected_Budget” (the reason I gave it this name and not the name shown in B5 is because we will have another field named “Budget” on the Data tab).

That should cover everything on the “Dash Board” tab; now let’s work on the “Data” tab. There are two ways to name a range. Let’s try both methods.

First method:

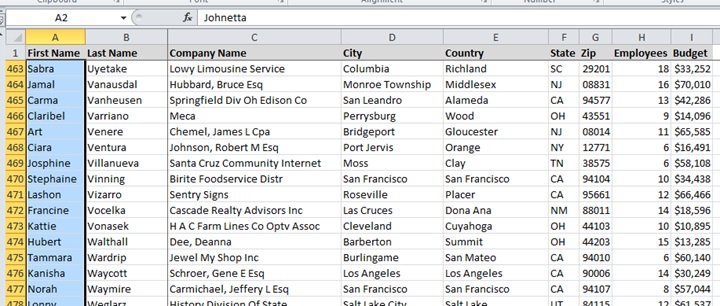
Click in the cell A2 to make this the active cell. Now press <Ctrl><Shift><Down Arrow>. This will select all the cells under “First Name”. Your screen should look something like this:

Named Range 3

Now, in the Name Box type in “First_Name.” Once you press <Enter>, the range A2:A501 will also be known as Project_State and can be used in any formula or reference.

Second method:

Click in cell A1 to make this the active cell. Now press <Ctrl><Shift><End>. This will select the entire data table. Now, from the menu bar, select Formulas and click on Create from Selection.

Named Range 4

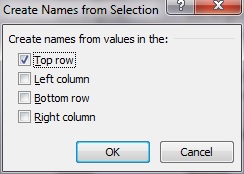
You will get a pop-up asking where the titles can be found. Select only Top Row.

Named Range 5

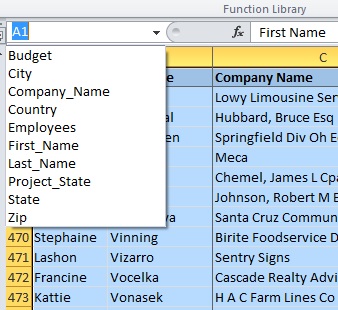
Ta-da! We now have named ranges for each column. To check this, press the dropdown arrow to the left of the Name Box.

Named Range 6

As you can see, all spaces in the title will be replaced with underscores (“_”).

So now we can create our formulas in a more sentence-like style. Here are a few examples that can be created quickly and will be easy to understand by anyone reading them.

  • =SUM(Budget)
  • =Countif(State, “=CA”)
  • =Average(Budget)
  • {=SUM(IF(State=Project_State,IF(Employees>=Techs_Required,IF(Budget>=Projected_Budget,1,0),0),0))}

A couple of thing to keep in mind about named ranges:

  • If a name already exists on the tab, it will automatically be overwritten without prompting
  • If a name already exists on another tab, you must specify the tab or it will default to the current tab’s name
    • For example Data!Budget will reference the range Budget on the Data tab
    • Adding new cells to the end of a range does not automatically extend the range
    • Inserting new cells in the middle of a range does automatically extend the range
    • Do not use reserved words when naming a range (select, if, sum…)

As you can see, using named ranges can not only make reviewing formulas easier, but you can also create new formulas more quickly.

EXCEL: Finding Errors In Formulas

Standard

No one is perfect, although some of us are more so than others. But when it comes to finding problems in complex Excel formulas there are ways to help you on the road to perfection.

So, you just wrote this amazing formula in Excel. It will cut you work time in half and may even win you the Nobel Prize in Spreadsheet. Only one problem. It doesn’t work.

At this point you have a few options:
• You can spend hours reading and re-reading the syntax hoping to find the offending character
• You can give up and try a less glamorous equation
• You can swallow your pride and bug the in-house Excel Geek
• OR… You can trace the error yourself!

Excel comes with the ability to Evaluate Expressions. It is easier to explain how it works by showing you an example.

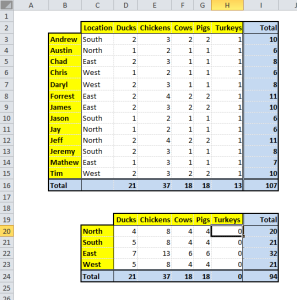
Evaluate Formulas 1

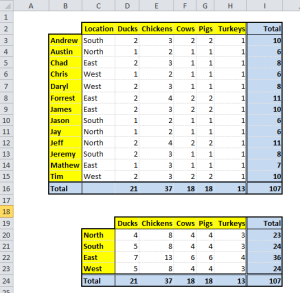
These tables show all the farmers in the state by region and their livestock. But as you can see, the sum of Turkeys by region is not calculating. Here are the actual formulas I use.

Evaluate Formulas 2

As you can see, I am using an Array Formula to calculate the SUM of Turkeys (cells H$3:H$15) based on the region (cells $C$3:$C$15). The formula looks correct and should work, so why is it displaying 0’s?

NOTE: All Excel menu and screen layouts will be references from version 2010. These features exist in all versions, but in different locations.

To have Excel evaluate the formula for you, just click in the cell (in this case H20) and then go to the Formulas menu tab and click on Evaluate Formula.

Evaluate Formulas 3

This will open a window showing the current selected formula and what is being evaluated.

Evaluate Formulas 4

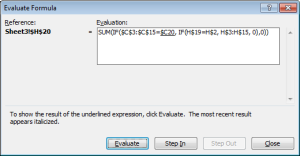
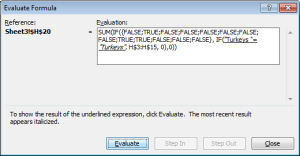
Let me explain what you are seeing in this window. The current formula being evaluated is listed under Reference, Sheet3$H$20. In the Evaluation section you see the formula in its current state with the next parameter to be evaluated underlined, $C$20. All you need to do is press the Evaluate button to see what Excel is doing step by step. After pressing it a few times you will get to this point:

Evaluate Formulas 5

Here we can see it is about to compare “Turkeys ” to “Turkeys”. BINGO, one of the Turkeys has a space at the end. No wonder it’s not working correctly. All I need to do is delete that hanging space and TAH-DAH!

Evaluate Formulas 6

It’s easy being an Excel Guru when you know how to use the tools.