Tech Tips for Techs: Outlook Signature Creation

Standard


I recently had a client ask me how to input photos and hyperlinks into  his Outlook signatures, to make them stand-out better. I realized this is an often-overlooked art that should be well-known.

In order to recreate the steps necessary for this blog, I am using an Exchange account with Outlook 2010. Your results might vary.

In order to edit and create signatures, in Outlook 2010 you can browse to:

File ->Options ->Mail ->Signatures. 

This opens a window that allows you to create and edit your signatures. Let’s start by creating a new signature. 

Set up the normal text you need in the signature. As you can see, the options you are given is very similar to Word. You can modify the color, font and size of all text. Input everything you need and, once done, you are ready to insert hyperlinks and really take your signature to another level.

The first step is to download all of the photos you need in your signatures. Many professional social media sites give you links that they prefer you to use. Microsoft also gives you links and a brief tutorial here as well.

Once you have the photos downloaded, you can insert them into your signature. Click on the “insert picture” link, navigate to your photo, and insert it into your signature.

Sign1
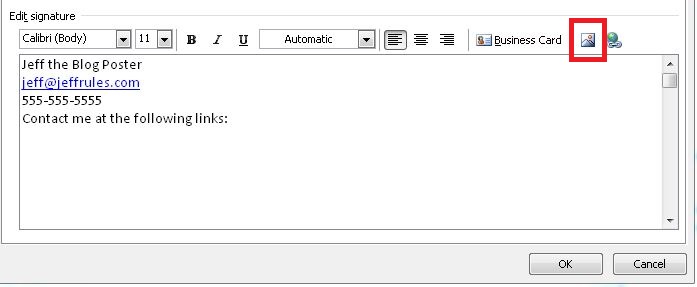
Once your picture is in the signature, click on it (you will see blocks appear around the picture) and click the hyperlink button.

Sign2

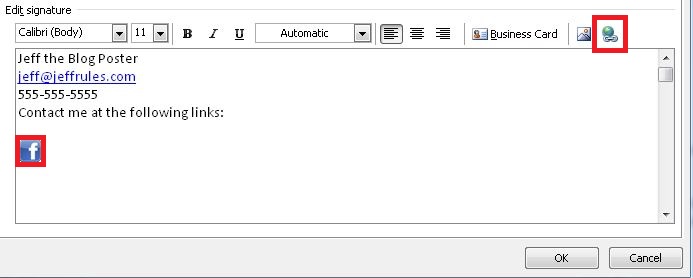
This opens a new window that allows you to type the hyperlink you need to input.

sign3The middle area does not matter what it is set on. You just to have to ensure you are choosing the first option on the left “Existing file or Web Page,” and then type the address properly in the address bar. Once you do that, you will have a clickable link in your signature!

A couple of things to note about Outlook signatures: The type of signature creation I am reviewing with you is only for users who can read HTML emails. If the client to whom you are sending an email cannot read HTML for their email (i.e. if they are using Outlook Web Access), then they can only see Plain Text.

Plain Text is a type of view that does not allow for pictures, or any editable features, such as colored, specialized fonts. I would also recommend creating a signature that you can use for Plain Text, should you need it. This is just a standard signature with no color, no special fonts, no pictures or hyperlinks. You can then pick and choose what signature to use. This is convenient to ensure any formatting you create always stays current with your brand.

Also, once you input the pictures, you do not need to save them on your machine, as once you input them into Outlook, Outlook takes the pictures and saves them into their AppData. If you set up your signature and test, be aware that if you are testing with an account that cannot send the email back in HTML, it will break the links.

One example is if you set up the links, then send to your Gmail account, and respond via Gmail on a smartphone, it will send the email back and the formatting will show the name of the picture, and NOT the picture itself (hyper-links will still work, but you won’t see your photo)

See below for an idea of what this looks like when you receive a reply that is not formatted in HTML:

sign4


Pictures can be in any format that is acceptable for pictures (.gif, .jpeg, .png), and when you add them to your signature, it really enhances the look and marketability of your brand!

Sign5


Quick Tip: How to Mass-Send Personalized Emails, Via Word

Standard


A few days ago, I confronted a project: the annual update for our 37-person company directory. I knew I wanted something better than the generic, blank form I’d emailed out last year. I also knew there had to be something easier than copying and pasting our existing records – of every single person – in order to individually email them all.

There was!

email mail merge blog - 1I was already quite familiar with Word’s Mail Merge function, having used it for years to convert my personal address database into print-‘em-off, peel-and-stick labels for my Christmas cards. (No, that’s not cheating. It’s efficient time-management.) But I couldn’t find a similar mail merge function in our email software — we currently use Outlook 2010, at work. So I ran a search in Outlook Help. The answer to my email dilemma… was back in Word!

1. I started a new Word document, went to the “Mailings” tab and, from the “Start Mail Merge” dropdown, I selected “Email Messages.” Then I typed up the basic version of the letter I wanted to email out to everyone.
email mail merge blog - 2

2. Next, I went back to the “Mailings” tab. This time I clicked the “Select Recipients” dropdown. I already had the old database from last year, so I picked the “Use Existing List…” option and browsed for my file. (Note: in order for this to work, you need to have your recipients’ email addresses as one of your database’s fields. You’ll need it for Step 4.) I added the fields that I wanted personalized in my generic letter. (Dear <<Name>>…,)
email mail merge blog - 3

 3. Just like in a regular Mail Merge, with an email merge you can edit your recipient list and preview your results to check for errors. When you’re happy with how it all looks, go to “Finish and Merge” and select “Send E-mail Messages….”
email mail merge blog - 4

4. Then, from the dialogue box that pops up, select your database field that contains the email addresses.
email mail merge blog - 5

5. When that’s done, click “OK.” Boom. Messages all sent. You’re done!


Tech Tips for Techs: Public folders in an Office 365 hybrid environment

Standard


Crash blog - Jan 2014 In this TechTip, I want to address an interesting quirk we discovered in a client’s O365 hybrid implementation back in September. During the process of migrating all of the mailboxes to the cloud, the decision was made to leave the Public Folders on their on-premises Exchange 2010 server. While the migration was going, we discovered that there was a small subset of those migrated mailboxes that couldn’t access or expand the public folder structure. When attempted, they were presented with the following error in Outlook:

Cannot expand the folder. Microsoft Exchange is not available. Either there are network problems or the Exchange server is down for maintenance.

I was able to recreate this same issue on my computer for an account that works fine, as well as for the non-working user. After an exorbitant amount of netsh tracing, Outlook logging, permission verification on the 365 and on-prem sides of the wire, we discovered that there’s an account attribute that get used in the authentication process back to the on-prem Exchange box. It’s called LinkedMasterAccount.

Evidently in a hybrid environment, if this attribute is populated, authentication against an on-prem Exchange server’s public folders will fail with that vague error message I mentioned above. The solution here is a fairly quick and easy one - clear the attribute from the AD account.

In the on-prem Exchange server, fire up the Exchange Management Shell, and run the following Powershell command: Set-User -Identity [email protected] -LinkedMasterAccount $null Once that’s been run, force a FULL DirSync to run, close Outlook, and try again.

And remember, you can always contact us at [email protected], or reach us at 888-244-1748, for help. We’re available 24/7!

Tech Tips for Techs: Testing email Auto-Configuration issues within Outlook

Standard


I recently had to utilize the Auto-Configuration feature in Outlook, and, to my surprise, nobody else had even heard of this being a possibility. Therefore, I felt the need to write a blog post about it and share with all of you.

So what happens if your client is having issues connecting to their Exchange server with Outlook? Where do you start, and what information should you be looking for? Well, for starters, you need to ask some basic questions:

  1. Is this happening to one user, or to the entire company?
  2. Can you connect to Exchange via OWA and send/receive messages, or not?
  3. Are all Exchange services started on the server?
  4. Run a test from testexchangeconnectivity.com and review results. Do you like what you see?

Answering these basic questions (and I know there are a ton more, but these are a good place to start) will help you get to the problem quickly (and I could write a novel on different issues and directions to go into, but this post is about one specific feature in Outlook, to help with troubleshooting).

But what if your Outlook is not connecting to Exchange, and you know everything is correct? You can actually ctrl+right click on the Outlook logo in the icon notification location in the task bar (where the small icons are on the right), and you will have many options for troubleshooting.

OutlookAutoConfigAs you can see here, you can review its Connection Status, or Test E-mail AutoConfiguration. This test is great for troubleshooting just that. In some cases it might be the only location you can find the results you are looking for.

When you click on the Test E-mail AutoConfiguration, it will open a new window. Here, you can input an email address and password (although this isn’t needed in a local Exchange environment, only hosted). My preference is to uncheck the GuestSmart options (they seem to be a bit useless).

EmailAutoConfigI have, of course, blocked out my personal information here, but this dialogue box will give you quite a bit of details on how your Outlook is connecting and what it is looking for. If you click on over to the Log or the XML tabs, you get even more information.

My AutoConfiguration is clean. However, I have used this to troubleshoot connection issues with clients in the past, and it gives you specific Microsoft error codes that sometimes you can’t find anywhere else. Take a look at this AutoConfig, which has errors connecting on HTTPS. This is causing the client to get SSL Library pop-ups within Outlook. Through these errors I was able to track down the issue and find a resolution online.

AutoConfigIssueThis tool is extremely useful to assisting in your troubleshooting for connection issues with Outlook, regardless of whether you are using it with an exchange account or not. I highly recommend you keep this in your toolbox of tips.


Quick Tip: How to add a poll to an email in Outlook

Standard


It’s Election Day again! But while you’re waiting to find out who won the midterms, you can do more than just check your news feeds: you can stage your own voting topic. I recently learned a super-easy way to add a poll to an email in Outlook. This is a great way to get feedback from everyone in the office on topics from, “Should we take the designer’s advice and paint the walls red?” to “Where should we go for lunch today?” The only catch is that you have to be running on a Microsoft Exchange server. (If you’re unclear as to whether or not your company has one of these, you might have to ask your tech support. If that happens to be Everon, you can call us at 888-244-1748.)

With a poll, you can do anything from ask a yes/no question, request an accept/decline response, or ask a question with a multiple-choice response. Here’s how, using Outlook 2010 for this demo:

1. From Outlook’s Home tab, select “New E-mail.”

Email poll 1


2. Click in the body of the new email. Then go to the Options tab. Select “Use Voting Buttons,” and pick from the drop-down menu. (For our demo, we’re going to use the “Custom” buttons.)

Email poll 2

3. In the Voting and Tracking options section, type your categories into the space, using semicolons to separate them. Today, for our demo, we’re doing a poll to see who had the winning costume in our Halloween costume contest. I entered seven categories, separated by semicolons, and clicked “Close.”

Email poll 3

4. Now all you have to do is add your message and subject line. Once you click “send,” your recipients will get an email with a poll line in the header.  (If your colleagues aren’t familiar with email voting, you may need to instruct them on how to do this.)

5. If you’ve sent the poll to yourself, you will also have the opportunity to vote. When you or anyone makes selections, you will get an email-update on the individual’s vote (yeah, it’s not 100% private this way, but only the original poll-sender can see these things).

6. You will also be able to easily track the entire group’s responses. Go to any of the response-emails and hover over the “i” line in the header (the voting section). The line will turn yellow. Click it, and you will have the option to view all of the voting responses.

Email poll 5

If you select “View voting responses,” you will get a summary-tabulation of how many votes each category has, as well as a table that breaks out how individuals voted. It’s that simple!

So… where are you all going for lunch today? ;)