Tech Tips for Techs: Problem Steps Recorder

Standard


Many of us engineers have a certain way we talk to a client, a certain way we interact to find the issue, and a certain way we troubleshoot issues. So when it comes to little-known tools within your Windows operating system to make your life easier, most of us wouldn’t go looking for a new way to troubleshoot. However, I would like to tell you about one tool that could change the way you troubleshoot issues with your clients.

Problem Steps Recorder

psr
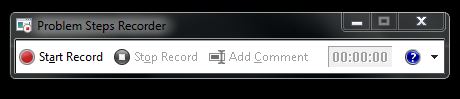
This tool was originally a part of Windows 7; Microsoft brought it back in Windows 8. It is built into your OS. To find it, either type “psr.exe” in the search, or run box, or search for Problem Steps Recorder.

Once you have it open, it is a very simple tool with minimal buttons. You simply press ‘Start Record,’ and all of your movements done on the operating system will be recorded into a handy document that you can share. This especially useful for techs: if a client explains an issue, but you need to actually see what they did (in order to reproduce the error), and you cannot get on their machine, they can record everything for you with this tool. You can then review the document and assist in troubleshooting. It’s that simple.

When you hit ‘Start Record’, it begins creating a MHTML document, with screenshots of the work you are doing. Every mouse-click or typing on the keyboard creates a new screenshot. In the middle of your recording, you can click the ‘Add Comment’ button. What this does is very similar to the Snipping Tool. It greys out the screen, allowing you to highlight the area you are interested in (say you want to highlight the actual error), and then add a comment.

When you are done with the recording, you hit Stop Record, and it creates a handy zip file, which you can then email. Inside is the MHTML document. When you click on this, it opens like a web-page and gives you details on your recording, including the screenshots, which you can highlight (via mouse-over), and see the comments you made when you took that screenshot.

A recording is too long to put into this article, however here is a screenshot with a caption for an example!

A recording is too long to put into this article, however here is a screenshot with a caption for an example!

Problem Steps Recorder is a great tool to allow you to become a better-informed technician with your clients.


Tech Tips for Techs: Windows 10 and the Cisco AnyConnect VPN client

Standard


As a tech who provides remote support, I rely fairly heavily on several VPN clients to connect to a variety of networks for my day-to-day work. I recently acquired the Technical Preview for Windows 10, and immediately installed it on one of my spare laptops.

(Disclaimer - I subscribe to the “every-other-one” theory in regards to Microsoft OSes. This is to say that every other operating system that M$ releases is a complete piece of garbage. e.g.,

Windows 3.1 - crap
Windows 3.11 - not bad
Windows 95 - crap
Windows 98 - not bad
Windows ME - crap
Windows 2000 - not bad
[exception] Windows XP - not bad
Windows Vista - crap
Windows 7 - not bad
Windows 8 - crap

I completely skipped Windows 8 because I despise the interface, so I avoid it like the plague.)

W10

Microsoft’s Windows 10 Start Menu

That said, I’m surprisingly not-as-disgusted by the Windows 10 interface as I thought I might have been, despite how many remnants of 8 are hanging around. I have to hand it to Microsoft — they did a pretty good job melding the two without completely offending the zealots of both the 7 and 8 camps. After deciding not to promptly format the hard drive after the install, I started installing most of my ‘regular’ applications onto it without any drama until I got to the Cisco AnyConnect VPN client.

I should have known.

After typing in my firewall’s address and pressing Enter, I was promptly greeted with a message saying "Failed to initialize connection subsystem." Gee - that’s nice. A cursory search of the intArwebz brought me to a couple of common things and solutions people have seen with this piece of software: changing the name of the connection in the registry, uninstall and reinstall, deleting multiple instances of the VPN adapter, etc etc. Of all the things I tried, I didn’t think to try the most obvious (which was the winner, I might add.) So much for the K.I.S.S. principle.

First, I changed the DisplayName of the vpnva service in HKLM\SYSTEM\CurrentControlSet\Services\vpnva by deleting the string of garbage in front of the word Cisco (@oem8.inf,%VPNVA64_Desc%). This caused the connection process to “think” a little longer than normal, but ultimately brought up the same error. Drat.

Second, I noticed that the VPN Adapter in my network connections was disabled. Re-enabled it… same problem. Ugh.

Third, I tried uninstalling, cleaning out the registry, rebooting, checking the registry again, rebooting again, and reinstalling. Same problem.

Fourth, I was going to manually tell it to Run as Administrator, but before clicking the option I was reminded about Compatibility Mode. D’oh! How could I have forgotten that? I set it to run in compatibility mode for Windows 7, fired it up, and it connected. Like a charm. No fuss, no muss. Evidently, there’s something about the Windows 10 kernel that causes the 3.1.x AnyConnect software not to want to connect. So for anyone out there running on the bleeding edge, and you use Cisco’s AnyConnect client… check the simple things first. ;)


Mac Tips for Techs: Onyx for Mac — your #1 cleaning tool

Standard

OnyXOnyx for the Mac. If you are not a Mac Genius, but you know a bit about IT, you may have wondered how to clean a Mac like you can a PC. This is the tool that can take you where you need to be!

Onyx has been likened to Piriform’s C-Cleaner tool, however, this tool has many more functions than the Piriform tool you are used to using on a PC. First off, you can get the Onyx download from here. (Take note of your OS, as you must download and install the Onyx version that works with your OS. You can also use that link to get some older versions of Onyx for the older Mac OSes as well.)

When you launch Onyx for the first time, you are immediately requested to check the SMART status of the hard disk installed in your Mac. This is highly recommended and only takes around 30 seconds, so let that scan. It will let you know if there is anything it finds that needs to be resolved. From there you can use the Disk Utility application to resolve SMART errors on the disk. Regardless of whether you have SMART errors, you can still proceed to work within Onyx for other items.

The latest version of Onyx has many tabs: Verifying, Maintenance, Cleaning, Utilities, Automation, Parameters, Info, and Log. Onyx is well known for its Cleaning tab, in which you can choose to clean your System cache, User cache, Internet cache and cookies, Fonts cache, Logs, Mics items, and Trash. (In the trash tab, you also have a chance for securely deleting the trash, which means the files deleted are securely overwritten with jumbled data.)

In addition to the Cleaning tab, you can also do so much with the other tabs:

The Maintenance tab allows you to repair permissions, build and run scripts and rebuild aspects of the OS.

The Verifying tab runs the same SMART and structure checks of the hard disks and partitions that run on start-up of Onyx, so if you need to re-run those commands, you can run them from there.

The Utilities tab has many sub-tabs with a wealth of functions. I would suggest you go through this and see for yourself what you can do, as there are too many to name here. You will need to understand IT quite a bit more than normal, however, as some of the commands in the Utilities tab can be a bit daunting.

The Automation tab allow you to do several of the Onyx options all in one. It is very helpful if you want to set up a bunch of tasks to run off of one push of the button.

The Parameters tab is one of my favorites. This tab is really good for customizing your Mac, as you can set up animated desktop backgrounds, customize Finder and Dock options, and even edit options for some of Apple’s most-used applications (Safari, iTunes, Quicktime). You also have the ability to edit and display messages on login, and customize the spotlight, mission control, and others.

The last two tabs are self-explanatory: Info and Log. Both display exactly what you expect them to. The Info tab shows model information, processor, RAM, disk info, OS, profile, antivirus protection information, and whole host of other info. Basically, anything and everything you might be looking for to learn about the Mac will be stored in here. The Log tab shows the logs that are written based on the functions of Onyx, in case you need to review why a function did or did not work.

This is an extremely powerful tool that should be a part of any Mac IT engineer’s repertoire. It is even a great tool for anyone with basic information on Macs, as it can help keep your mac clean and healthy for years to come.

If you would like to review Onyx on a Mac, feel free to call in to our Mac engineers at Everon IT: 888-244-1748.


Troubleshooting Microsoft Updates

Standard

computer frustration


This blog is entirely dedicated to resolving random issues with Microsoft Updates. For the most part, Microsoft Updates work as expected, and you are able to safely download and install them with no issues, however what happens when Microsoft Updates cannot be downloaded, or installed? What do you do with the random, bland error messages you receive? Here are a few things you can do, and these solutions are by no means the ONLY solutions out there, but it is a good start for fixing a very odd/tough issue.

To begin, I will cover a few errors you might see when trying to download or install Microsoft Updates. I am also going to assume you have already checked the basics, such as ensure you are connected to the Internet, ensure you can get to update.microsoft.com successfully, etc. A few of the errors you might see are the following:

Digitial Signature Not Found

The Cryptographic Operation Failed due to a Local Security Option Setting

Setup could not Verify the Integrity of the file update.inf. Makes sure Cryptographic Service is running on this Computer

Here are also a list of the various error codes you might encounter:

  • 0×80096001
  • 0×80096005
  • 0×80096010
  • 0x800B0001
  • 0x800B0003
  • 0x800B0004
  • 0x800B0109
  • 0x8007f0da
  • 0x8007f01e

As I mentioned, these are just a few of the many various errors you can come across, and after you try each solution, reboot your machine and then try Windows Updates again, and one of them might actually fix your issue:

1. Set Cryptographic Services to automatic -This method could be the easiest and quickest. Windows Updates will not run if you have this service set to manual or disabled.

2. Rename the Catroot2 folder. This is only found on Windows XP or Server 2003 machines, however you should be able to rename the folder, and it will rebuild successfully. You must stop the cryptographic services first, and then rename the folder, and at that time you can then restart the services and reboot. The catroot2 folder is found in the following location: %systemroot%\system32\catroot2.

3. Re-register the DLL files associated with the cryptographic services -Maybe you cannot get this service to start successfully. Re-registering these should hopefully fix that service:

regsvr32 /s softpub.dll
regsvr32 /s wintrust.dll
regsvr32 /s initpki.dll
regsvr32 /s dssenh.dll
regsvr32 /s rsaenh.dll
regsvr32 /s gpkcsp.dll
regsvr32 /s sccbase.dll
regsvr32 /s slbcsp.dll
regsvr32 /s mssip32.dll
regsvr32 /s cryptdlg.dll

4. Rename the edb.log file -In the catroot2 folder, there is a database log file that can become corrupted. You can try renaming this file, however if you have already renamed the catroot2 folder, and allowed it to rebuild, this method most likely will not assist you.

5. Use a product such as C-Cleaner to clean out temp files and fix broken registry entries -Piriform makes a great product that does a deeper cleaning than what a simple disk cleanup can handle. Check out the product here: www.piriform.com

6. Empty the Software Distribution folder -To do this, you need to first stop the Automatic Updates services, and then browse to C:\Windows\SoftwareDistribution. These are updates that downloaded properly, however might be stuck in limbo and cannot get installed.

If any of these steps did not work, you can also try the hotfix found here: http://support.microsoft.com/kb/822798 or search Microsoft’s Technet forums for answers. As I mentioned there are MANY different reasons why updates will not work, but hopefully some of these methods will find a solution for you!