Tech Tips for Techs: The Cipher Command

Standard


For many technicians, reusing a computer is part of the job. We have taken many computers, formatted the hard drives, re-installed OSes, and re-purposed the machines for other uses.

Did you know that when you reformat a hard drive through the standard Windows methods (i.e. deleting the partition during your Windows 7/Windows 8 install), you actually leave behind traces of your old OS? Reformatting a drive does not get rid of all of the data. In order to do that, you want to overwrite any existing data present with 0s (technical term referring to binary code).

How is this possible? Windows actually has a pretty cool built-in tool for handling this, called cipher.exe.

cipher

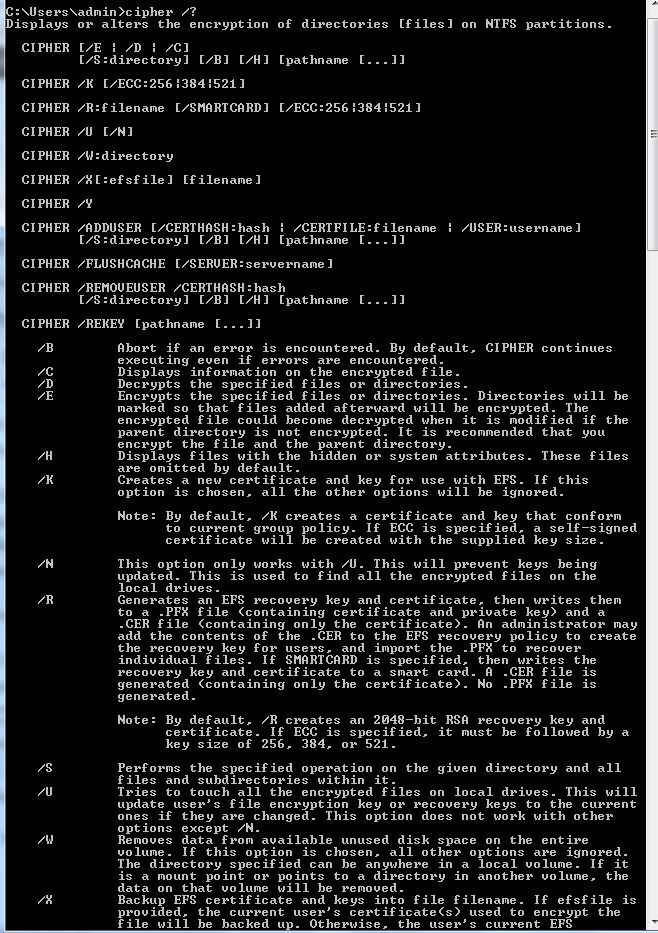
Cipher was built to encrypt and decrypt files and folders, but it can be used to overwrite data as well. Simply put, in order to securely overwrite your partition with 0s, open a CMD prompt and type: cipher /w:{drive letter}:

You can actually overwrite individual folders as well, just by adding the folder name onto the cipher CMD, like this: cipher /w:{drive letter}:\{folder name}

You can also encrypt files by using the CMD: cipher /e (files and folders that are later added to this option will also be encrypted)

And, of course, you can decrypt files by using the CMD: cipher /d (same as above, any files and folders added later are decrypted by default)

For a complete list of commands, type cipher /?

As with anything, really, this tool will make it a lot harder to recover any data that might have been on the hard drive. However, it is never a guarantee. Virtually anything can be recovered on a hard drive. Forensic companies use write-blocking devices approved by the Department of Defense, but that equipment is very expensive, and usually only in the hands of the good guys. Cipher.exe will protect you against most low-level bad guys looking to recover potentially harmful data off of your hard drive.

Tech Tips for Techs: Little-known, extra steps for CryptoWall and Cryptolocker cleanup

Standard

html-file-thmb

Hello all! Today I would like to contribute some information to something we had previously put out when talking about CryptoWall and CryptoLocker. The previous blog posts talked about the virus itself and what actions to take if you become infected with it. In addition to that, I would like to provide instructions on what further actions to take.

Today I received a call from a client, on whose system I had recently cleaned up an infection and restored their data from a backup. She told me that the computer that had been the original culprit was popping up once again with the decrypt instructions, and she was concerned that it was infected again. She took the actions I told her to take, to disconnect the network drive so it wouldn’t spread. I jumped on that machine and, sure enough, the web page had returned.

I scanned the computer with a malware removal tool, but, to my surprise, nothing showed up. Then I started rifling through the “My Documents” directory. Voila! I found the three “decrypt instructions” that get put in every directory that gets infected. (These are files that Crypto loads on to infected machines and servers, telling victims where to send their money, etc. But they are text files — not harmful in and of themselves.) At this point, I just shook my head.

When I’d performed the original cleanup, and every cleanup I have done since then, I did NOT remove these files. When I’d done the scans for the malware and deleted the malware itself, I’d assumed that those files were part of it and would get removed, as well. With the scan coming back clean and the data restored, I’d sent them on their merry way. But those files are not malware and obviously would not show up on the scans.

Moral of the story, ALL those files need to be deleted or they will pop up from time to time, with 1 of the 3 being an HTML file. Once you have scanned and cleaned up the malware, do a search of the C drive and every other data drive for *decrypt and find/delete all the decrypt instruction files. In this case I made a wrongful assumption that caused widespread panic.

However, sometimes you just have to learn as you go. ;)

If you need help from truly experienced techs, give us a call at 888-244-1748. We treat your technology as though it’s our own.

Tech Tips for Techs: Dealing with errors when creating IRM rules in Office 365

Standard


In this TechTip, I want to address a potential fix for an error message we’ve come across when creating a rule in Office 365 that encrypts email messages. Encryption in O365 leverages a Microsoft service called “Information Rights Management,” or IRM. This is supposed to be an enabled/provisioned feature for an Enterprise (read: E3) tenant when it’s created, but as we’re all painfully aware, not all of these automatic provisioning things happen as they’re supposed to. That having been said, if you’re trying to create encryption rules in 365 and run into the following error, chances are that IRM isn’t completely/properly enabled and you’ll have to do it manually through Powershell:

You can't create a rule containing the ApplyOME or RemoveOME action because IRM licensing is disabled.

Should you see this, log into MOP as a global admin, and from Service Settings -> Rights Management -> Manage make sure that Rights Management is active. Once done (and making the assumption that you are in North America), connect to Powershell as a global administrator, and run the following commands:

Set-IRMConfiguration -RMSOnlineKeySharingLocation “https://sp-rms.na.aadrm.com/TenantManagement/ServicePartner.svc”

Import-RMSTrustedPublishingDomain -RMSOnline -name "RMS Online"

Test-IRMConfiguration -RMSOnline

Set-IRMConfiguration -InternalLicensingEnabled $true

The third command (Test-IRMConfiguration) should come back with an overall result of PASS. If it does not, you will not be able to run the fourth. If you hit a FAIL during the test, contact your 365 support folks. We’re advised that this can take up to 24 hours to take effect. I’ve seen it apply as quickly as within a few minutes, but if not, wait the obligatory full day before raising hell. ;)

top secret file

Spotlight on Small Business Week: Start with your Password

Standard


To remain secure, start with using password best practices.

  • Length: 8-12 characters at minimum, but 16-18 are even better.
  • lockCombination: Your password should include a mixture of letters (uppercase and lowercase), symbols and numbers.
  • Keep them random: Use a random combination of the above, making sure to stay away from birthdays and family names.
  • Change them regularly:  Change your passwords frequently (at least every 60 days)
  • Log-out: Be sure to log-out of your session once you are complete. Do not leave any room for someone to access your network under your name.

Password Mistakes

  • Do not use your birth, graduation, or anniversary dates for your number combinations.
  • Do not use your children’s’ names, close friends’ and family names, or pet’s name for your letter combination.
  • Do not have any variations of the following passwords as these are the most popular: “password,” “123456,” “12345678,” “abc123,” “qwerty,” “monkey,” “letmein,” “dragon,” and “111111.”
  • Do not have your account automatically logged-in on your phone. Mobile security is key to protecting your passwords.
  • Do not keep your password hints on sticky notes, near your desk or anywhere that can be seen.

small business week specialFor more information on password security, check out this Jan. 2014 article by Wah Lee, Everon’s Principal Project Engineer.

To request a FREE Security Bulletin Update, contact us at  [email protected]  and put “Free Security Tips” in the subject line.


Passwords and Encryption: How to easily protect your files and folders

Standard


In a business environment our data is our lifeline. Whether it is transactions, logs, data collection, or spreadsheets, making sure our information is protected is paramount. Below are a few of my favorite easy and secure ways to keep peace of mind.

Excel/Word/PowerPoint

In the two latest builds of the popular Microsoft Office suite, 2010 and 2013, there is a built-in password protection tool for the three most-used applications: Excel, Word, and PowerPoint. When initially creating the document/spreadsheet select “File” on the top tab and select “Info” on the left-hand sidebar. There will be an option to protect the document (“Protect Workbook”).

BLOG9-1

Then select the option to “Encrypt with Password”

BLOG9-2

Simple as that!

AxCrypt

AxCrypt is a very powerful tool used for encrypting single files. One downside is that the application needs to be installed on the PC receiving the file in order to decrypt it. However, the process is very easy. Once installed, simply right-click on the file you wish to encrypt using AES 128-bit and select AxCrypt > Encrypt.

BLOG9-7


Type the desired password you wish to use to decrypt the file and press ok. All done!


NOTE: There are NO BACKDOORS into AxCrypt. If you forget your passphrase, your documents are likely to be irretrievably lost. Write it down, or print it, and keep it in a safe place!

7-zip

If you have ever worked with .ZIP files you have most likely used 7-zip at some point. 7-Zip is a cabinet file manager. One unique feature of 7-zip is that has the ability to create a .ZIP file that is also encrypted. The process is very easy: just highlight the files you wish to “Zip up” and right click on one of them. Then select 7-zip > Add to archive.

BLOG9-6


From here, type the desired password in the Encryption section. It is very important here to select the AES-256 Encryption method. This uses the industry standard encryption protocols rather than the proprietary ZipCrypto method.


Data protection is key in this competitive world. Protect your data, protect your future!