Tech Tips for Techs: Microsoft utility for resolving Exchange calendar issues

Standard


In this tech tip, I want to talk about one of Microsoft’s automated tools that you can use to help check for and {sometimes} to resolve issues with Exchange-based calendars. This applies to both on-premise Exchange as well as to Office 365. The utility is called CalCheck, and it was most recently updated back in July of 2014.

Available for download directly from Microsoft [HERE]; it will install and run on everything from Windows XP SP3 all the way through Windows 8.1. There are several ways and options with which to run the tool, but for the purposes of the article I’m only going to cover two of them.

The first, “read only,” will process whatever mailbox you point it at, outputting the log and error files to the directory in which CalCheck is running from.

1. Open a command prompt in the CalCheck directory. In my case, this is in my Downloads\CalCheck_x86 folder. Type calcheck and press Enter. It will prompt you for the profile that you want to check. (It’s important to note that you will need an Outlook profile on your machine for the mailbox you want to check, unless you know the LegacyExchangeDN for that mailbox.) Choose the profile, and click OK. The program will proceed to check the calendar, and will notify you in the command prompt when it’s finished.

15-0119_calcheck_clean

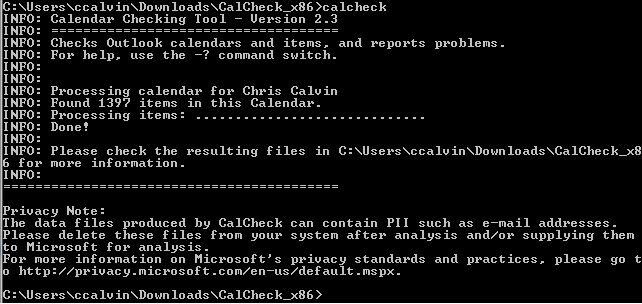
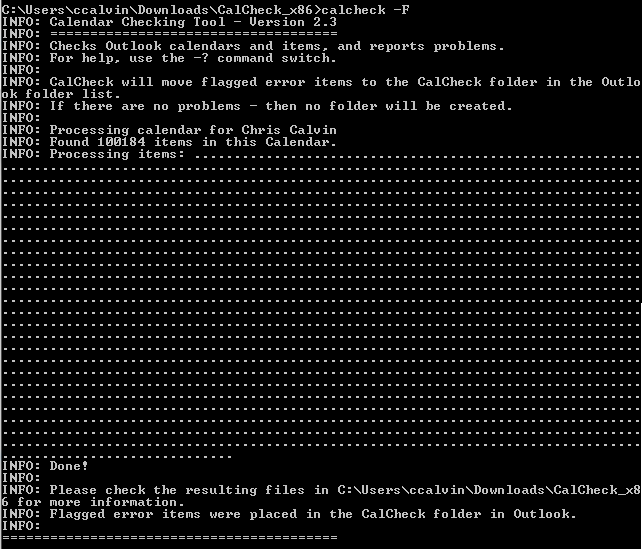
2. Same as the first (except we’ll be adding a flag), type calcheck -F into the command prompt. You will be asked again for which profile you want and the program will proceed as it did in “read only” mode. The notable exception is that for any problematic items it finds, it will create a folder in the Inbox called CalCheck and move them into that folder. See the screenshot below for a calendar I ran this on that should have only had about 1,400 items total… CalCheck found over 100,000! It took close to 3 hours to process and clean out the entire calendar!

15-0119_calcheck_clean

The README file in the CalCheck download will provide much better detail on the other options available to you when running this utility, but this post should give you a good starting point if you find yourself dealing with a problematic calendar where you’re unable to pin down a specific issue.


Android vs iOS vs Windows vs Blackberry! Who will reign supreme?

Standard

Wah - blog image (2)


Let’s compare size: you know that size sometimes does matter.

According to a Gartner, a leading information technology research company, Android OS phoned finished 2013 with a 78.4% market share, Apple’s iOS accounted for 15.6 %, Microsoft Windows phones were at 3.2%, Blackberry at 1.9 %, and other operating systems came in at just .9 %. So if size matters, then Android is the way to go. Check out the pretty chart:

Wah - blog image (2b)

So here is my take on the whole situation:

Android

  • I have an Android phone, currently Samsung Galaxy s3.  Aside from the fact I like the virility of the operating system, I really like the phone hardware. I will be upgrading to a Galaxy s5 when it comes out later this year.
  • Majority of the apps are free, and Android has the second largest app market, behind Apple (but you have to pretty much pay for everything on Apple).
  • Good advantages for remote management and has very good integration with Google Cloud and other cloud products.
  • Overall I find the Android OS to be the most well-rounded for both personal and business uses.
  • Android is a really cool name.

 Apple IOS: 

  • My wife has an iPhone 4 or 5 ( not really sure).
  •  If you own various Apple products you’ll have easy integration with them.
  • It has the largest app market, but you pretty much have to pay to play anything good (in my opinion).
  • If you are looking for some bells and whistles but still want grandma to be cool, this is it.
  • I am biased on Apple products. While I think they are great, they can be challenging for integration as well as management in a business environment.
  • It seems all the kids on the playground (and their grandparents) have iPhones nowadays.

Windows Phone: 

  • I am going to buy my parents a Windows phone, due to some very low cost of entry on certain models. Also the fact the tile screen icons are huge and easy on the eyes.
  • I do not think this is ready for business, it really gears towards multimedia and connecting to the web. If you are in the social media space I would really recommend to check it out.
  • Great integration with Office 365, Skype, Facebook and other mainstream cloud products.
  • Small app market, but there are huge pushes already in progress to close the gap.
  • I am a fan of the hardware on some of the phones but I get really annoyed by the Tiling feature of the OS.  Think Windows 8, but on a mini-screen.

Blackberry:

  • I have some old relics and I plan to keep them. When I did have the old Blackberries I loved them: they were fast, light, had a great battery, and the keyboard was just great. I could respond to an email on the phone at the same speed it would take me on my laptop keyboard.
  • It has the best security and integration if you have a Blackberry Enterprise Server.
  • Fastest handle time from when an email gets sent to its delivery on any phone I have seen.
  • Some of the phones that have recently been introduced are not really that great.
  • Blackberry’s app market is not really good. I was on it one time, and I just gave up.
  • Right now there is just no reason to go with them unless you are in banking, government, or really need specific security requirements.

Keep in mind that these are just my personal thoughts. The best way to decide for yourself is to play with the operating system to see what your personal preference is and go from there.

How to white list a sending domain in Office 365.

Standard

As an Office 365 technician, there is always a broad range of questions that we get asked on a day-to-day basis. The questions tend to vary but a common question we get asked is “How do I white list a domain that sends to me on a regular basis?” Well for any that have wondered how to do this, here is how.

The first thing is going to be to log into Office 365 as an administrator over your tenant. Once you are logged in, you will need to access the Exchange Management Console.

ExchangeConsole

Once you are in the Exchange Management Console, you will need to select Mail Flow and then Rules. 

MailFlow

Once there, you will need to hit the “+” button to create a rule that is Bypass Spam Filter. Name it something along the lines of  ”white list for domain.com.  Under the drop down for “*Apply this rule if…” select The Sender’s address is.  It will have you input a domain. (Note: do NOT put the @ symbol)

Your rule should look as follows:


Office 365 - Distribution Group vs. Security Group

Standard

Office 365 being the convenient work-horse that it is, there are multiple items that can be confusing and something that will take some getting used to.  Today we are going to talk about one of these scenarios, and that is when to use Distribution Groups and when to use Security Groups.

First off, I will start off explaining why it is so confusing. When you first log into the Microsoft Online Portal, you are directed to the “Admin Overview Page”. From here you can select “Users and Groups”. Simple right? You would think that you could manage everything “groups” related from this one spot. Wrong! From this location, you can create and manage “Security Groups” and “Mail-Enabled Security Groups”.

bl1

To add more confusion to the mix, a “Mail-Enabled Security Group” looks and functions similar to a distribution group. One of the differences, and MOST important difference, between the 2 are a “Mail-Enabled Security Groups” require an owner that manages every aspect of the group including membership. Once an owner is assigned, not even a Global Administrator can modify/delete the group. A “Distribution Group” does not require this.

To clarify where these 2 differ and when to use them, remember this one VERY simple rule of thumb. If you are strictly “cloud based” (meaning you are using ONLY Office 365), then you should only utilize “Distribution Group” function. If your solution is federated with on on-premise exchange server (meaning you are using Office 365 AND an on-premise Exchange Server) then you would ONLY utilize “Security Groups” to manage permissions and NOT to send mail to.

bl2

Anytime you need to create a group that you are going to be sending mail to, then ALWAYS use a “Distribution Group”. If you are needing a group that will manage permissions of users and items when you have a federated environment, then utilize a security group.

As confusing as this all may be, if you remember the rule of thumb listed above, then you should be in a great spot. If you have any questions, Everon has a group of engineers that are specialized in Office 365 and would be more than happy to answer your questions.

Cheers!


Fixing autodiscover issues with Outlook 2010 and Office 365

Standard

An issue we’ve seen with some frequency is when folks are switching from on-premise Exchange to Office 365 / Exchange Online, Outlook keeps pointing back to the local Exchange server, even when public DNS points Autodiscover to the cloud. This behavior manifests itself because of the way that Outlook 2010 handles Autodiscover. Much like how you can override DNS lookups with the Windows HOSTS file, Outlook 2010 can (and often does) behave the same way.

Before reading on, make sure that Windows and Office are both completely up-to-date. Microsoft released update KB2687503 that allowed Outlook 2010 to connect to 365 out of the box. If this update IS installed and Outlook 2010 isn’t connecting to Office 365, then read on.


To fix the oddball autodiscover behavior, we need to first check and make certain that your computer resolves Autodiscover correctly by doing an nslookup. Open the command prompt, and type the following:


nslookup autodiscover.<yourdomain>.com 8.8.8.8


Note: If your nslookup results DON’T look similar to what you see above, you will need to correct your DNS entries at the registrar of your domain before continuing.


Once we’ve confirmed that public DNS looks good, then we need to remove the hardcoded Autodiscover entry from the registry.


[WARNING – modifying the registry can cause irreversible damage to your operating system or programs – so be absolutely certain you do not delete or change anything that is not within the scope of this article!]

  • Close Outlook if it’s running
  • Open up the Registry Editor by clicking Start -> Run. In the dialog box that pops up, type regedit and press enter
  • Navigate to: HKEY_CURRENT_USER\Software\Microsoft\Office\14.0\Outlook\Autodiscover
  • Look for a key with your domain name in it, right click on it, and delete it


regedit


  • Now open My Computer, and go to C:\Program Files (x86)\Microsoft Office\Office14\OutlookAutoDiscover
  • Look for an XML file with your domain name in the filename, and delete it


deletexml


  •  Then from the Control Panel, create a new mail profile for your 365 account, and voila!


controlpanelmail


mailsetup


addmailprofile


newprofilename


addnewaccount


profilecomplete