Physical Ways to Protect Your Network From Being Hacked

Standard


There are all kinds of security threats to a company’s network, and while no security is foolproof, there are things you can do to help maintain your network’s integrity.

To protect individual computers, you should disable a computer’s ability to automatically install new USB drives. This prevents malicious software from instantly loading when a device is plugged in. However, this will only affect the new devices from being installed. Your keyboards and mice will still work.

maninthemiddleattack
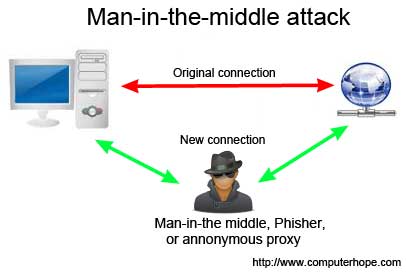
One of the best ways to prevent physical devices on the network from being hacked is to prevent access to them. Securing routers and modems in areas that are open to the public will prevent someone from tampering with them. Additionally, enforcing controlled access to network rooms helps prevent man-in-the middle attacks. Controlled access should apply to the server room, as well, to prevent someone from plugging in a USB with malicious programs, or uploading a virus directly to the server.

Mantrap
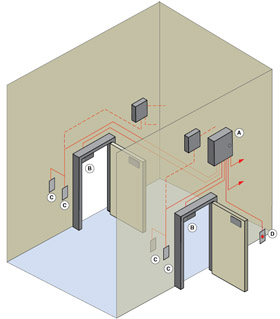
However, having a secured entry to locations has its weakness, too — mostly unintentional, human error. The most common mistake is kindness to other people. This sounds bad, I know, but it can be dangerous to hold a door for someone. Or to let in someone in who forgot his/her key card. The bad guys will try to play on the kindness of others. There is also tailgating — when someone with access to an area opens the door, and then another person catches the door before it closes. This is one way criminals gain access to secured areas without the necessary credentials. The best protection against tailgating is a mantrap (no, we are not talking about Indiana Jones-type traps). A mantrap is created when you have to go through two doors to access the secure room, preferably with a hallway between the two doors. This method traps the tailgater in-between the two doors and helps prevent access to the secure area. 

These are easy ways you can help prevent physical devices from being tampered with. And your network from being hacked. If you have any questions, or would like to discuss further security options for your company, please give us a call at 888-244-1748. Or email us at [email protected]. We’re here for you 24/7, 365.


Top 7 Wireless Security Habits You Should Have for Your Home Network

Standard


There are things the average; non-tech can do to ensure a safer, more secure network at home. For purposes of this article I’ve used a Cisco / Linksys device, but many of these tips can be translated to whatever wireless access device you’re using.

1. Change the default administrator password for your WAP device (WAP = wireless access point). To me, this is the most important of all of these points.  It’s different for every wireless type.  Check with your manufacturer’s instructions (the ones that came with the device, when you bought it), for your default password. Logon with these defaults and change your password.

Tim - blog post image 2.JPG

Tim - blog post image 3


2. Turn off the WPA/WEP Encryption. Of all the levels of encryption, these are the weakest, the least secure. Select WPA-2 from your dropdown list for the strongest encryption available for wireless networks.


3. Enable MAC address filtering for the laptop or device that needs to authenticate to your WAP. “MAC address” doesn’t mean an Apple Mac computer. The MAC address is the unique hardware address of the device. This list allows only those who are defined, or specified, to access your wireless network.

Tim - blog post image 4


4. Change and hide your default SSID. SSID refers to the name of your wireless network or Service Set IDentifier. You can hide your network name from being broadcasted.

Tim - blog post image 5


5. Enable firewall & AV (antivirus) on each computer and WAP (firewall only). That will create another, added layer of security to prevent a hacker from accessing your WAP.

Tim - blog post image 6


6. Position WAP in the center of your home, and not near exterior walls, to eliminate any signal leakage. This is an interesting point: most of the time wireless signals can broadcast about 1000sq feet. The signal broadcasts out in all directions, 360 degrees. If you place it in the back of the house, your neighbor is going to get a stronger signal than you are, at the front of your house. Also, they make plenty of signal boosters to get good signal throughout your environment. This varies amongst all households and building structures, but is still something to think about.

Tim - blog post image 1


7. If you’re leaving, like on a vacation, disable the broadcast of your wireless. A lot of people don’t do this. They leave on vacation, and this gives hackers plenty of time to get into their network, unnoticed. I just unplug mine when I go out of town. Simple as that.

Tim - blog post image 7

Happy vacationing!


Tech Tips for Techs: Outlook Signature Creation

Standard


I recently had a client ask me how to input photos and hyperlinks into  his Outlook signatures, to make them stand-out better. I realized this is an often-overlooked art that should be well-known.

In order to recreate the steps necessary for this blog, I am using an Exchange account with Outlook 2010. Your results might vary.

In order to edit and create signatures, in Outlook 2010 you can browse to:

File ->Options ->Mail ->Signatures. 

This opens a window that allows you to create and edit your signatures. Let’s start by creating a new signature. 

Set up the normal text you need in the signature. As you can see, the options you are given is very similar to Word. You can modify the color, font and size of all text. Input everything you need and, once done, you are ready to insert hyperlinks and really take your signature to another level.

The first step is to download all of the photos you need in your signatures. Many professional social media sites give you links that they prefer you to use. Microsoft also gives you links and a brief tutorial here as well.

Once you have the photos downloaded, you can insert them into your signature. Click on the “insert picture” link, navigate to your photo, and insert it into your signature.

Sign1Once your picture is in the signature, click on it (you will see blocks appear around the picture) and click the hyperlink button.

Sign2

This opens a new window that allows you to type the hyperlink you need to input.

sign3The middle area does not matter what it is set on. You just to have to ensure you are choosing the first option on the left “Existing file or Web Page,” and then type the address properly in the address bar. Once you do that, you will have a clickable link in your signature!

A couple of things to note about Outlook signatures: The type of signature creation I am reviewing with you is only for users who can read HTML emails. If the client to whom you are sending an email cannot read HTML for their email (i.e. if they are using Outlook Web Access), then they can only see Plain Text.

Plain Text is a type of view that does not allow for pictures, or any editable features, such as colored, specialized fonts. I would also recommend creating a signature that you can use for Plain Text, should you need it. This is just a standard signature with no color, no special fonts, no pictures or hyperlinks. You can then pick and choose what signature to use. This is convenient to ensure any formatting you create always stays current with your brand.

Also, once you input the pictures, you do not need to save them on your machine, as once you input them into Outlook, Outlook takes the pictures and saves them into their AppData. If you set up your signature and test, be aware that if you are testing with an account that cannot send the email back in HTML, it will break the links.

One example is if you set up the links, then send to your Gmail account, and respond via Gmail on a smartphone, it will send the email back and the formatting will show the name of the picture, and NOT the picture itself (hyper-links will still work, but you won’t see your photo)

See below for an idea of what this looks like when you receive a reply that is not formatted in HTML:

sign4


Pictures can be in any format that is acceptable for pictures (.gif, .jpeg, .png), and when you add them to your signature, it really enhances the look and marketability of your brand!

Sign5


Mac Tips for Techs: Activity Monitor -the Task Manager for a Mac

Standard


Before my Mac completely ticked me off, and I broke up with Apple, I was dealt a blow had been frustrating and ongoing (more on that in later blog posts). I had not been able to get my machine to turn off the digital optical out; my speakers were unusable on my MacBook Pro.

Because of this, and after a ton of Google research, I had been trying various troubleshooting techniques. One of them was to stop the CoreAudio service.

On a PC this is simple: you open Task Manager, you browse the running processes, and you kill them. However, how do you stop processes from running on a Mac? You can use a great utility called Activity Monitor, which is a built-in tool on the Mac that can be found by typing Activity Monitor into your spotlight.

ActivityMonitorFrom here, this should look pretty similar to Task Manager. You have your processes listed, and you can sort the list in a variety of ways. You can also select individual processes and click the X in the upper left-hand corner to kill the process.

You can also search the processes via how they affect memory, energy, disk, or the network, in addition to the default of CPU. This is crucial if you are troubleshooting certain issues with your Mac — such as whether you are low on RAM, or maybe the Mac’s battery life is dying too quickly (check the energy tab).

This is a great tool for troubleshooting a Mac, and should be included in any technician’s toolkit.


Dear Mac Users, sorry for your loss…. move on.

Standard


Lately I have been writing a lot of blog posts for my love of all things Apple, and for the most part I am still very much in love with Apple products. However, this week has been hell for me with my Mac mini at work. I feel the need to vent here.

As I have mentioned before in blog posts (found here and here), you might want to think twice about installing Yosemite. But the allure of having the latest OS for my Mac was getting to me, so over the past several weeks, I had been trying to install Yosemite on my Mac… with discouraging results.

When downloading and installing Yosemite, I would consistently receive the following error:

YosemiteInstallErrorI did extensive research to find out what was going on. I even downloaded the Yosemite installation on a separate Mac on a separate network, and still, when trying to install on my Mac mini at work, I received the error.

I even tried creating a bootable Yosemite USB drive (found here), but no luck! What gives?!

After much research, I thought the answer was that I was using an Apple account to download the package that was not associated with a previously purchased OS. I had heard grumblings that you cannot install Yosemite unless you have a previous OS on your Apple account (which I didn’t necessarily believe), however, I figured, “Why not?” So I signed in with my personal Apple account. I have a purchased OS on the account, I tried the update, and that’s when everything went dark.

This might as well have been what happened to my Mac-Mini...

This may as well have been what happened to my Mac-Mini…

My Mac gave me the Apple-equivalent of the blue screen of death:

BSOD

I tried restarting the Mac and found that not only could I not finish Yosemite, but I couldn’t boot into Mavericks, either! Oh no! What will happen to all of my sweet cat photos that I use as wallpapers? (No, I did not back up this Mac beforehand.)

This is one of my favorites; Starcraft Kitteh...

This is one of my favorites; Starcraft Kitteh. (Source: http://catsinspacesuits.tumblr.com/)

I ended up booting into the recovery utilities (Apple+R) and trying to repair the disk via Disk Utility. Sadly, it would not repair the disk. To be honest, I have been in this situation before, and I have NEVER seen Disk Utility actually repair the OS, so I didn’t have high hopes.

I also tried testing the hardware on the Mac by holding down the D-key upon startup. I received an error stating that it could not connect to Apple to perform the tests (this is an Internet-based test). I had nothing left to do but to go back to Mavericks with a new installation.

I installed Mavericks and decided, “Now that I have a fresh, completely new version of a Mac OSX, maybe I can update to Yosemite now?”

NOPE.

NOPE.

No matter what I did, I could not update to Yosemite. Fine. If Yosemite didn’t want me, I didn’t want it. I would stay with Mavericks and enjoy my Apple life.

Upon deciding to install the rest of my applications, I was greeted with another Mac BSOD! And again, like last time, I could not boot to Mavericks! Argh!

At this point, I was done with Apple. I was ready to become a Microsoft lifer and swear off Apples forever. However, I powered through, installed Mavericks one more time, and installed all of my applications.

At this point, though, I am cowering in fear of my Mac mini. I feel like, any wrong turn, and I will receive the ill-fated BSOD. I am scared of my Mac right now, and that isn’t the way to be. As a technician, you can’t be scared of the system you are working on. Being an IT engineer, you need the confidence that you can fix anything. That is the best way to succeed in this ever-challenging business, so, with that, I need to learn more about Macs. I need to learn how to read the kernel panic commands I am receiving, and I need to take charge and show the Mac who is boss!

I figure in the coming weeks I will tackle this head-on and try to beat it. But for right now I am a wounded duck, cowering in the weeds, hoping the hunter doesn’t find me.

I expect that my love of all things Apple will come rushing back when I make a breakthrough. Then, you can expect more Mac posts from me. But not at the present moment. Right now, Apple and I are having a little spat.